
10 Simple Steps to Arrange Anthurium in a Flower Frog
Start by gathering your materials: a flower frog, sharp scissors, a vase, and fresh anthurium stems. Choose vibrant, unblemished anthuriums, trimming the stems at an angle.
Place a flower frog in your half-filled vase and begin inserting the longest stems first. Gradually add the mid-length and shortest stems, adjusting each for the perfect angle.
Incorporate filler greens for balance, trimming them diagonally. Confirm all stems are firmly positioned and tweak any angles for symmetry.
Maintain a clean workspace and regularly check the arrangement's stability. Discover further tips to perfecting your anthurium display with ease.
Key Takeaways
- Gather materials: flower frog, scissors, vase, water, and fresh anthurium stems.
- Trim anthurium stems at an angle and remove leaves below the water line.
- Place the flower frog in the vase and fill halfway with clean water.
- Start arranging with the longest stems, followed by mid-length and shortest stems.
- Add filler greens, trimming diagonally, and position them for balance and depth.
Gather Your Materials
Begin by collecting all the essential materials: a flower frog, a pair of sharp scissors, a vase, water, and your fresh anthurium stems. Lay them out on a clean, spacious surface for easy access.
Start with the flower frog; it's your base for arranging the flowers securely. Use the sharp scissors to trim your anthurium stems at an angle, ensuring better water absorption.
Fill your vase halfway with clean water to keep the flowers hydrated and vibrant. Place the flower frog at the bottom of the vase, anchoring it firmly. This setup will allow you to position each stem precisely, creating a stunning arrangement.
With all your materials ready, you're set to craft a beautiful anthurium display.
Choose Fresh Anthuriums
When selecting your anthuriums, look for stems with vibrant, glossy leaves and firm, unblemished blooms that radiate freshness. These signs indicate the plant's health and longevity.
Inspect each anthurium closely; the spadix should be upright and colorful, not drooping or discolored. Gently press the leaves and petals—fresh anthuriums will feel firm and resilient.
Avoid flowers with yellowing leaves or dark spots, as these are signs of aging or disease. Smell the blooms; a fresh anthurium will have a subtle, clean scent.
If possible, buy from a reputable florist or garden center where the plants are well-maintained. By choosing the freshest anthuriums, you'll secure your arrangement remains vibrant and beautiful for longer.
Select the Right Flower Frog
Choosing the appropriate flower frog is crucial, as this tool will provide the structural support necessary to showcase your anthuriums beautifully. First, consider the size and weight of your anthurium stems. A heavy-duty metal frog with sharp pins can hold thicker stems firmly, while a glass or ceramic frog with wider holes suits more delicate stems.
Next, think about the design. A low-profile frog allows the anthuriums to be the star, while a more decorative frog can add an artistic touch to your arrangement.
Prepare Your Workspace
First, gather all your tools—scissors, gloves, and your flower frog—so you're not hunting for them midway.
Next, clean and sanitize everything to guarantee your anthurium stays fresh and vibrant.
Gather Necessary Tools
To begin crafting your Anthurium masterpiece, gather a sharp pair of cutting shears, a sturdy flower holder, a clean vase, and a bucket of fresh water. These tools will be your allies in creating a stunning arrangement. Make sure your workspace is well-lit and spacious, giving you room to maneuver.
Here's a quick checklist to help you gather everything:
| Tool | Purpose |
|---|---|
| Cutting Shears | Trimming stems |
| Flower Holder | Securing stems in place |
| Clean Vase | Holding the arrangement |
| Fresh Water Bucket | Hydrating the flowers |
With these essentials at hand, you're ready to start arranging. Each tool plays a key role, so make sure they're all within reach. Now, let's move on to the next step and get our materials prepared!
Clean and Sanitize
Establishing a pristine workspace guarantees your Anthurium arrangement remains fresh and vibrant. Start by clearing your area of any clutter. Wipe down the surface with a mild disinfectant to eliminate any lingering bacteria.
Next, gather your tools—scissors, flower frog, and vase—and give them a thorough rinse in warm, soapy water. Make sure to dry them completely to avoid any rust or mold. Don't overlook your hands; wash them thoroughly to prevent transferring any oils or dirt to the delicate flowers.
Once everything's clean, line up your supplies neatly. This meticulous preparation sets the stage for a beautiful, long-lasting arrangement. Now, you're ready to begin the artful process of arranging your Anthuriums with confidence and precision.
Protect Work Surface
With your tools and hands clean, let's safeguard your work surface to maintain cleanliness and prevent any harm. Start by laying down a water-resistant tablecloth or plastic sheet. This will catch any water spills and soil bits.
Next, gather a few old newspapers or an absorbent cloth to absorb moisture and provide an additional layer of protection.
- Water-resistant tablecloth or plastic sheet: Shields the surface from water damage.
- Old newspapers or absorbent cloth: Absorbs spills and provides cushioning.
- Trash bag or bin nearby: Makes it easy to dispose of plant debris and cuttings.
- Small tray for tools: Keeps your tools organized and within reach.
Taking these steps guarantees a clean, damage-free workspace, making your anthurium arrangement process smooth and enjoyable.
Trim the Stems
Carefully measure each anthurium stem, making sure you trim them at a slight angle to maximize water absorption. Use a sharp pair of garden shears for a clean cut. Here's a quick guide to help you:
| Step | Details |
|---|---|
| Measure Length | Determine the desired height. |
| Cut Angle | Slant the cut at 45 degrees. |
| Remove Leaves | Strip any leaves below water line. |
| Inspect Stem | Check for any damaged parts. |
| Re-cut if Needed | Guarantee a fresh, clean cut. |
This methodical approach guarantees your anthuriums stay hydrated and vibrant. Always cut stems underwater if possible to prevent air bubbles, which can block water uptake. Follow these steps, and your anthuriums will flourish beautifully in your arrangement.
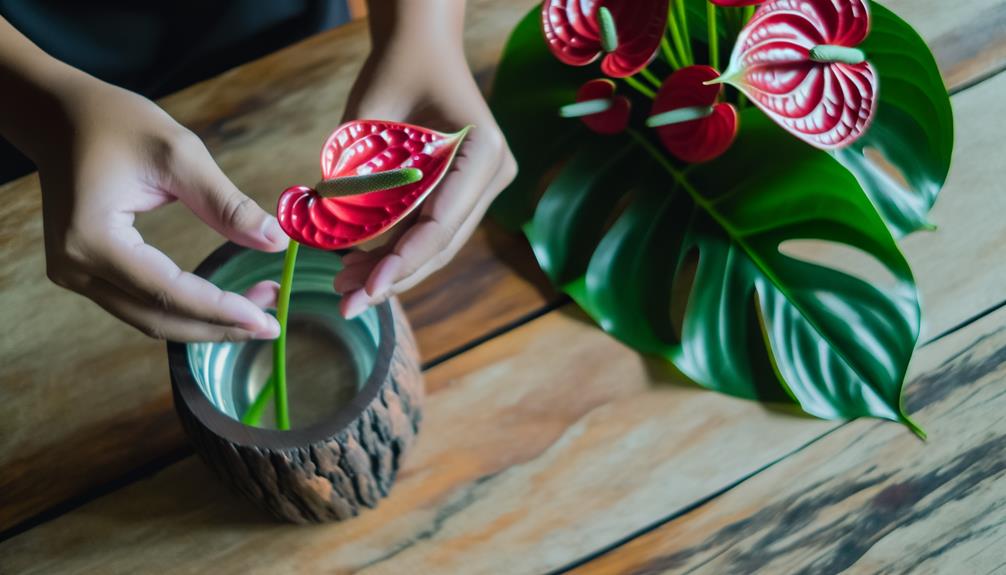
Position the Flower Frog
To secure your anthurium arrangement stays firmly in place, start by positioning the flower frog firmly at the bottom of your chosen vase. With a steady hand, verify the frog sits flat and stable, providing a solid foundation for your floral masterpiece.
Remember to:
- Choose the appropriate size: The flower frog should fit snugly within the vase.
- Clean the vase: Confirm no debris interferes with the frog's grip.
- Add water cautiously: Pour just enough to cover the frog without dislodging it.
- Check for stability: Gently press down to make sure it's secure and won't shift.
This careful preparation sets the stage for a stunning and steadfast arrangement, allowing your anthuriums to shine brilliantly.
Insert the Anthurium Stems
To start, trim the ends of your Anthurium stems at a sharp angle for best water absorption.
Next, carefully insert each stem into the flower frog, ensuring they're secure and stable.
Prepare Stem Ends
Begin by trimming the anthurium stems at a sharp angle, ensuring each cut maximizes water absorption for the vibrant blooms. This step is essential for maintaining the freshness and longevity of your arrangement.
After trimming, inspect the stems closely to remove any damaged or discolored sections.
To prepare your stems effectively, follow these tips:
- Use clean, sharp scissors or a knife to make precise cuts.
- Cut the stems underwater to prevent air bubbles from blocking water uptake.
- Strip off any leaves that will sit below the waterline to avoid bacterial growth.
- Recut the stems every few days to keep them fresh and hydrated.
Positioning for Stability
With your stems perfectly prepped, carefully start inserting the anthurium stems into the flower frog, ensuring each one is anchored securely for a balanced and eye-catching display. Begin with the longest stems, positioning them in the frog's center to provide structure. Gently press each stem into the holes, making sure they're stable and won't wobble.
Here's a quick reference table to help you:
| Step | Action | Tips |
|---|---|---|
| 1 | Start with longest | Center placement for structure |
| 2 | Insert mid-length | Surround the longest stems |
| 3 | Add shortest | Fill in gaps evenly |
| 4 | Check stability | Ensure no wobbling |
| 5 | Adjust as needed | Balance and symmetry |
Achieving Desired Angles
Achieving the desired angles for your anthurium stems involves a careful dance of positioning and patience to confirm each bloom faces the right direction. Start by gently inserting each stem into the flower frog, confirming it's secure but not forced. Rotate the stems slightly to find the perfect angle.
Here are some tips:
- Adjust heights: Vary the stem lengths to create depth.
- Check symmetry: Validate the arrangement looks balanced from all sides.
- Test stability: Wiggle the stems to affirm they're firmly in place.
- Fine-tune: Make small tweaks to perfect the angles.
Adjust Flower Heights
To craft a visually dynamic arrangement, meticulously trim each anthurium stem to varying heights, ensuring a pleasing balance and natural flow.
Begin by selecting your tallest bloom, which will serve as the focal point. Trim its stem to a length that allows it to stand out prominently.
Next, pick medium-height flowers to frame the tallest bloom, cutting their stems slightly shorter. This creates a tiered effect, drawing the eye naturally upward.
Lastly, trim a few stems to the shortest length for the outermost layer, adding depth and dimension.
Remember to step back and assess the arrangement from different angles, adjusting as needed to achieve symmetry and harmony. Your attention to height variation will make your anthurium arrangement truly enchanting.
Add Filler Greens
Now that you've adjusted the flower heights, it's time to add filler greens for a lush, complete look.
Start by choosing suitable greens that complement your anthuriums, then trim them carefully to maintain balance.
Choosing Suitable Greens
When selecting filler greens for your Anthurium arrangement, opt for varieties that complement the bold, glossy leaves without overshadowing their striking appearance. Choose greens that provide texture and subtle contrast, enhancing the overall look.
Some excellent options include:
- Fern fronds: Their delicate, feathery texture creates a soft backdrop.
- Eucalyptus sprigs: These add a hint of silver and a pleasant fragrance.
- Aspidistra leaves: Their broad, dark leaves can ground the arrangement.
- Ruscus: This hardy green offers a clean, structured look.
Mix and match these greens to create depth and interest. Place them strategically around the Anthurium blooms, ensuring they frame rather than compete with the vibrant flowers. This balance will make your arrangement both cohesive and eye-catching.
Trimming for Balance
With your selected greens in hand, it's time to trim them meticulously to achieve a harmonious balance in your Anthurium arrangement. Begin by evaluating the length and fullness of each stem.
Trim at a diagonal angle, allowing for improved water absorption. Remove any damaged or excessively large leaves that might dominate the delicate Anthurium blooms.
Aim for varying heights to create visual interest without overshadowing the main flowers. Position shorter greens near the base and taller ones towards the back or sides.
This layering effect enhances depth and ensures each element complements the other. Remember, your goal is to frame the Anthuriums elegantly, providing a lush, well-balanced backdrop that highlights their striking beauty.
Arranging for Texture
Adding filler greens to your Anthurium arrangement brings texture and dimension, transforming it from simple to stunning. Begin by selecting a variety of filler greens that complement the vibrant Anthurium. You'll want to contemplate greens that add contrast and depth.
- Ferns: Their delicate fronds provide a soft, airy touch.
- Eucalyptus: Its muted tones and round leaves add a fresh, modern vibe.
- Ruscus: This versatile green offers a dense, lush backdrop.
- Beargrass: Long and slender, it introduces an elegant, linear element.
Carefully insert each green into the flower frog, ensuring they intermingle naturally with the Anthurium stems. Vary the heights and angles to create a balanced, yet dynamic look. This methodical layering enriches your arrangement, making it a captivating centerpiece.
Final Touches and Care
Always maintain your Anthurium arrangement remains vibrant by spritzing the leaves gently and regularly checking the water level in the flower frog. Rotate the arrangement every few days to guarantee even light exposure. Remove any wilted leaves or blooms promptly to keep the display fresh.
Here's a quick reference table for Anthurium care:
| Task | Frequency | Tips |
|---|---|---|
| Spritzing | Daily | Use a fine spray |
| Water Level | Every 2-3 days | Keep water just above the frog |
| Light Exposure | Every few days | Rotate for even distribution |
| Removing Wilted | As needed | Use clean, sharp scissors |
Conclusion
You've now mastered arranging anthuriums using a flower frog!
Did you know that anthuriums can last up to six weeks with proper care? This means your stunning display won't only wow your guests but also stand the test of time.
Remember, each step—from trimming the stems to adding filler greens—enhances the beauty of these exotic flowers.
Keep practicing, and soon you'll be creating floral masterpieces that are both elegant and enduring.
Happy arranging!