Anthurium Cirinoi Care – A Complete How-To Guide
To care for your Anthurium Cirinoi, make sure it receives bright, indirect light – ideal near east or north-facing windows. Use a soilless mix with orchid bark, perlite, and peat moss, and water once the top inch is dry.
Maintain temperatures between 65°F and 80°F, with humidity levels at 70%-80%. Prune with sharp, sterilized tools and keep post-pruning soil moist.
Repot every 2-3 years using a well-draining mix. Inspect regularly for pests and use neem oil if necessary.
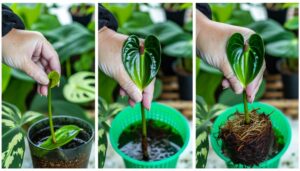
For propagation, use stem cuttings or division. There's so much more to uncover about keeping this exotic beauty thriving.
Key Takeaways
- Provide bright, indirect light; use artificial grow lights if necessary.
- Water when the top inch of soil is dry, using a soilless mix of orchid bark, perlite, and peat moss.
- Maintain humidity levels between 70-80% and temperatures between 65-80°F.
- Prune with sterilized tools and keep soil consistently moist post-pruning.
- Propagate using stem cuttings or division, ensuring high moisture for successful rooting.
Understanding Anthurium Cirinoi
Understanding Anthurium Cirinoi begins with recognizing its unique characteristics, such as its elongated, velvety leaves and distinctive veining patterns. This species, native to tropical rainforests, exhibits an epiphytic growth habit, meaning it typically grows on other plants rather than in soil.
Its leaves can reach lengths of up to 24 inches and display a rich, dark green hue with prominent white veins, enhancing its visual appeal. The plant's petioles are short and robust, supporting the large foliage effectively. Additionally, Anthurium Cirinoi produces inflorescences composed of a spadix and a spathe, characteristic of the Araceae family.
Understanding these features is essential for providing appropriate care and ensuring the plant thrives in your environment.
Ideal Lighting Conditions
To optimize growth, Anthurium Cirinoi needs bright, indirect light, as direct sunlight might burn its delicate leaves. You should aim for a spot where the plant will receive filtered light, such as near an east or north-facing window. If natural light is inadequate, consider using artificial grow lights that emit a full spectrum.
Maintain a consistent photoperiod of about 12-14 hours daily to replicate its native tropical habitat. Avoid placing the plant in low-light conditions, as this can result in etiolation, characterized by elongated stems and pale leaves.
Watering Schedule
When watering your Anthurium Cirinoi, make sure the soil remains consistently moist but never waterlogged to prevent root rot. This tropical plant flourishes with a regular watering routine, ideally once the top inch of soil feels dry to the touch.
Overwatering can lead to oxygen deprivation in the root zone, while underwatering may cause leaf wilting and browning edges. Use lukewarm, distilled water or rainwater to avoid mineral buildup. Employ a well-draining container to facilitate proper moisture levels.
During winter, reduce watering frequency as the plant's growth rate decreases. Humidity also plays a vital role; maintain ambient humidity levels between 60-80% with a humidifier or regular misting to mimic the plant's natural habitat.
Soil and Potting Mix
Maintaining proper soil and potting mix is essential for guaranteeing your Anthurium Cirinoi thrives, as it requires a well-aerated, organic-rich medium to support its root health and overall growth. You'll want to mimic the plant's natural epiphytic environment. Here's how:
- Soilless Mix: Combine orchid bark, perlite, and peat moss. This mix ensures aeration and sufficient drainage.
- Organic Matter: Incorporate compost or aged leaf mold to provide essential nutrients.
- pH Level: Aim for a slightly acidic to neutral pH (5.5-6.5), which supports nutrient uptake.
Avoid heavy, compact soils that retain excessive moisture, as they can lead to root rot.
Repot every 2-3 years to refresh the medium and accommodate growth. This will keep your Anthurium Cirinoi flourishing.
Temperature and Humidity
Maintaining perfect temperature and humidity levels is vital for the health and vigor of your Anthurium Cirinoi, as it flourishes in warm, humid environments similar to its native tropical habitat. Sustain a temperature range between 65°F to 80°F (18°C to 27°C) for peak growth. Steer clear of exposing it to temperatures below 60°F (15°C), as it can induce stress and impede development.
High humidity, ideally between 70% and 80%, is essential. Utilize a humidifier or place a tray of water near the plant to maintain these levels. Furthermore, misting the leaves regularly can assist in replicating the plant's natural environment.
Guarantee good air circulation to prevent fungal issues, but avoid direct drafts, which can lead to temperature fluctuations.
Fertilization Needs
Understanding the fertilization needs of Anthurium Cirinoi is important for best growth and health.
You'll need to select a balanced, water-soluble fertilizer and adhere to bi-monthly feeding schedules.
Watch for nutrient deficiency signs like yellowing leaves or stunted growth to adjust your fertilization regimen accordingly.
Optimal Fertilizer Type
To promote robust growth and lively foliage in Anthurium cirinoi, you'll want to use a balanced, water-soluble fertilizer with a ratio of 20-20-20, applied every four to six weeks during the growing season. This type of fertilizer guarantees an adequate supply of essential macronutrients:
- Nitrogen (N): Supports strong leaf and stem development.
- Phosphorus (P): Enhances root growth and flower production.
- Potassium (K): Strengthens overall plant health and disease resistance.
When selecting a fertilizer, make sure it dissolves fully in water to prevent root burn and facilitate nutrient absorption. Opt for formulations that include trace elements like magnesium, iron, and manganese to support overall plant well-being.
Always follow the manufacturer's dilution recommendations to avoid over-fertilization, which can harm your Anthurium cirinoi.
Feeding Frequency Guidelines
When applying a balanced, water-soluble fertilizer to your Anthurium cirinoi, aim to feed the plant every four to six weeks during its active growing season to maintain consistent nutrient availability. This period typically spans from early spring to late summer, when the plant's metabolic processes are at their peak.
Use a fertilizer with a nitrogen-phosphorus-potassium ratio of 20-20-20, diluted to half-strength to prevent root burn. Apply the solution evenly to the soil, avoiding direct contact with the foliage. Confirm the soil is moist before fertilizing to enhance nutrient uptake.
During the dormant season, reduce feeding frequency to once every eight to ten weeks, as the plant's nutrient demands decrease significantly.
Nutrient Deficiency Signs
Yellowing leaves or stunted growth in your Anthurium cirinoi often signal nutrient deficiencies that require prompt attention. Understanding these signs can help you adjust fertilization practices effectively.
Symptoms like chlorosis (yellowing between veins) indicate a nitrogen deficiency, while purpling of leaves suggests a phosphorus shortage. Potassium deficiencies may manifest as leaf edge browning.
To address these issues:
- Nitrogen Deficiency: Apply a balanced fertilizer with an NPK ratio emphasizing nitrogen, such as 20-10-10.
- Phosphorus Deficiency: Use a high-phosphorus fertilizer, like 10-30-10, especially during blooming periods.
- Potassium Deficiency: Opt for a fertilizer rich in potassium, such as 10-10-20, to strengthen cell walls and improve disease resistance.
Consistent monitoring and suitable fertilization guarantee robust Anthurium cirinoi growth.
Pruning Tips
When pruning your Anthurium Cirinoi, you'll want to focus on the best timing, appropriate tools, and necessary post-pruning care.
Perform pruning during the plant's active growing season for best results, using sterilized pruning shears to prevent disease.
After pruning, make sure the plant is adequately hydrated and exposed to indirect sunlight to promote quick recovery and continued growth.
Timing for Best Results
To achieve best growth and health for your Anthurium cirinoi, precise timing and technique in pruning are essential. Prune during the plant's active growth period, typically spring or early summer. This timing maximizes wound healing and new growth.
Follow these steps:
- Identify Dead or Damaged Leaves: Remove any yellowing or browning leaves first to prevent disease spread.
- Trim Spent Flowers: Cut off wilted blooms to redirect the plant's energy into new growth and foliage.
- Shape and Size Management: Regularly prune to maintain the plant's desired shape and size, ensuring adequate airflow.
Timing aligns with the plant's natural growth cycle, enhancing its vigor and resilience. Proper pruning fosters a healthier, more aesthetically pleasing Anthurium cirinoi.
Tools You'll Need
You'll need a pair of sharp, sterilized pruning shears to ensure clean cuts and prevent infections during the pruning process. Sterilization guarantees pathogens aren't transferred to your Anthurium Cirinoi. Use isopropyl alcohol or a diluted bleach solution for this purpose.
Precision scissors are also beneficial for trimming smaller, delicate areas without damaging the plant tissue. A sturdy pair of gardening gloves will protect your hands from potential irritants and contaminants.
For tough, woody stems, a pair of bypass pruners can deliver the necessary force without crushing the plant. Finally, have a clean cloth or paper towels on hand to wipe your tools between cuts, guaranteeing each incision remains as sanitary as possible.
Post-Pruning Care
After completing your pruning, make sure you provide your Anthurium Cirinoi with sufficient water and monitor its environment closely to facilitate peak recovery. Ensuring excellent post-pruning care is crucial for the plant's health.
Here are three essential steps:
- Watering: Maintain consistent soil moisture without overwatering. Use distilled or rainwater to prevent mineral buildup.
- Humidity: Keep humidity levels between 60-80%. Utilize a humidifier or mist the plant regularly.
- Light: Position the plant in bright, indirect light. Avoid direct sunlight, as it can cause leaf burn.
Repotting Guidelines
When repotting Anthurium cirinoi, choose a well-draining potting mix to prevent root rot and promote healthy growth. A mix containing orchid bark, perlite, and peat moss is ideal, as it provides aeration and retains moisture without becoming waterlogged. Select a pot one size larger than the current container to allow room for root expansion. Make sure the pot has drainage holes to avoid water accumulation.
Gently remove the plant from its current pot, shaking off excess soil. Inspect the roots for signs of rot or damage, trimming any affected areas with sterilized scissors. Position the plant in the new pot, filling in around the roots with the fresh mix. Water thoroughly, allowing excess to drain out, making sure the soil settles.
Pest and Disease Control
Maintaining the health of Anthurium cirinoi involves vigilant monitoring for common pests like spider mites, aphids, and mealybugs, as well as diseases such as root rot and bacterial blight.
You'll need to implement a multifaceted pest and disease control strategy:
- Inspection: Regularly check both sides of leaves and stems for signs of pests or disease.
- Treatment: Apply neem oil or insecticidal soap to eradicate small infestations. For bacterial blight, remove and dispose of affected leaves.
- Prevention: Guarantee proper watering techniques to avoid waterlogged soil, which can lead to root rot. Maintain a clean environment by removing dead plant material promptly.
Propagation Methods
Propagating Anthurium cirinoi typically involves stem cuttings or division, both of which require careful handling to secure successful growth. For stem cuttings, select healthy, disease-free stems. Cut below a node using sterilized shears, making sure each cutting has at least one leaf. Place the cuttings in a well-draining, sterile potting mix and maintain high moisture levels.
For division, gently remove the plant from its pot, and carefully separate the root clusters, making sure each division has at least one growth point. Replant the divisions in separate pots with an appropriate growing medium.
Here's a quick reference:
| Method | Key Steps | Important Tips |
|---|---|---|
| Stem Cutting | Cut below node, use sterile shears | Ensure high moisture levels |
| Division | Separate root clusters | Each division needs a growth point |
Using these methods will guarantee robust propagation of your Anthurium cirinoi.
Common Problems and Solutions
Caring for Anthurium cirinoi often involves addressing issues like root decay, pest infestations, and nutrient deficiencies to promote plant health. Root decay usually occurs due to overwatering or poorly draining soil. Promote soil aeration and water only when the top layer is dry.
Pest infestations, such as spider mites or aphids, can be treated with insecticidal soap or neem oil. Regularly inspect the plant for signs of pests.
Nutrient deficiencies often manifest as yellowing leaves or stunted growth. Address this by using a balanced, water-soluble fertilizer every two months.
Here are three common problems and their solutions:
- Root Decay: Improve soil drainage.
- Pest Infestations: Apply insecticidal treatments.
- Nutrient Deficiencies: Use balanced fertilizer.
Conclusion
Caring for your Anthurium cirinoi might seem challenging at first, but remember: mastery lies in attention to detail.
With proper lighting, precise watering, the right soil mix, and vigilant pest control, you're not just growing a plant—you're nurturing a living piece of art.
Follow these guidelines and watch your Anthurium thrive, transforming your space into a verdant sanctuary.
Keep learning and adapting; your plant's beauty depends on your dedication and knowledge.

