Anthurium Schlechtendalii Propagation in 3 Simple Steps
Propagate your Anthurium schlechtendalii in three simple steps. First, gather sharp, sterilized pruning shears, well-draining potting mix, rooting hormone, humidity dome, and small pots with drainage holes.
Second, select a healthy plant, expose its root system, trim any damaged roots, and separate natural offshoots using a sharp knife. Finally, plant each section in the prepared potting mix, keep the soil evenly moist, and maintain a 60-80% humidity level.
Place the pots in bright, indirect light to promote healthy growth. For more detailed guidance on each step and tips for success, continue ahead.
Key Takeaways
- Select and Prepare Plant: Choose a healthy Anthurium schlechtendalii and trim any damaged roots.
- Divide the Plant: Use a sharp knife to separate natural offshoots from the main plant.
- Plant Divisions: Place each section in a well-draining potting mix and ensure roots are adequately covered.
- Maintain Humidity and Moisture: Keep soil consistently moist and maintain humidity levels between 60-80%.
- Provide Indirect Light: Ensure the plants receive bright, indirect light for optimal growth.
Gather Your Materials
To successfully propagate Anthurium schlechtendalii, you'll need a few essential tools and supplies to maximize growth and health. Start with a pair of sharp, sterilized pruning shears to guarantee clean cuts, minimizing plant stress and infection risk.
Use a well-draining potting mix, ideally a blend of orchid bark, perlite, and peat moss, to maintain moisture without waterlogging. You'll also need rooting hormone to promote root development and increase propagation success rates.
A humidity dome or clear plastic bag can help maintain high humidity levels, essential for initial growth. Lastly, prepare small pots with drainage holes to avoid root rot. Having these materials ready will set a solid foundation for a healthy propagation process.
Prepare the Plant
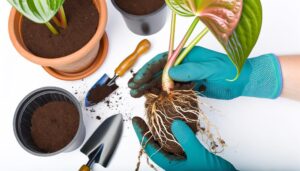
Begin by choosing a healthy Anthurium schlechtendalii with sturdy leaves and no signs of disease or pests, making sure the plant is well-hydrated before you start.
Carefully remove the plant from its pot, gently shaking off excess soil to expose the root system. Examine the roots, searching for firm, white roots indicative of healthy growth, and trim any brown or mushy sections with sterilized pruning shears.
Identify a suitable section of the plant for division, focusing on areas where natural offshoots or clumps have formed. Use a clean, sharp knife to sever the connection between the mother plant and the offshoot, ensuring each division has ample roots and at least one healthy leaf.
This preparation guarantees successful propagation.
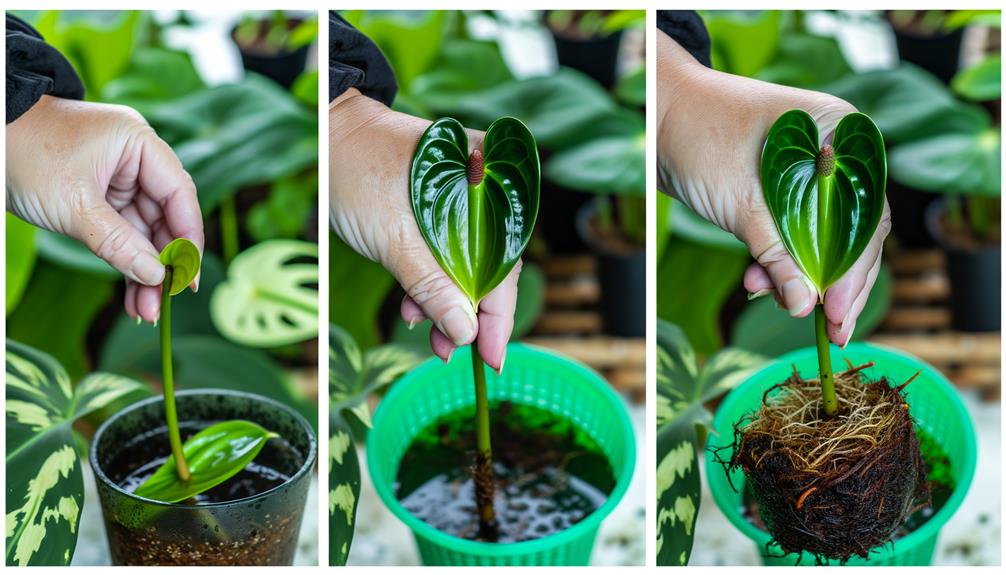
Plant and Care
Once you've divided the plant, place each section into a well-draining potting mix that includes equal parts of orchid bark, perlite, and peat moss, ensuring the roots are spread out and covered adequately.
To promote healthy growth, follow these steps:
- Watering: Keep the soil consistently moist but not waterlogged. Water when the top inch feels dry.
- Humidity: Maintain high humidity levels, ideally around 60-80%. Use a humidifier or place the pot on a tray of wet pebbles.
- Light: Provide bright, indirect light. Direct sunlight can scorch the leaves, while low light may inhibit growth.
Monitor your Anthurium regularly for signs of stress, such as yellowing leaves or root rot, and adjust care as needed.
Conclusion
You've now mastered the propagation of Anthurium schlechtendalii. With patience and care, your new plants will flourish.
Take Sarah, for example—she followed these steps and transformed her garden into a tropical paradise.
Remember, consistency in watering and proper lighting are key.
As you nurture your Anthuriums, you'll not only expand your collection but also gain a deeper appreciation for the beauty and intricacy of plant propagation.
Happy growing!