Step-by-Step Guide to Make a Paper Anthurium Flower
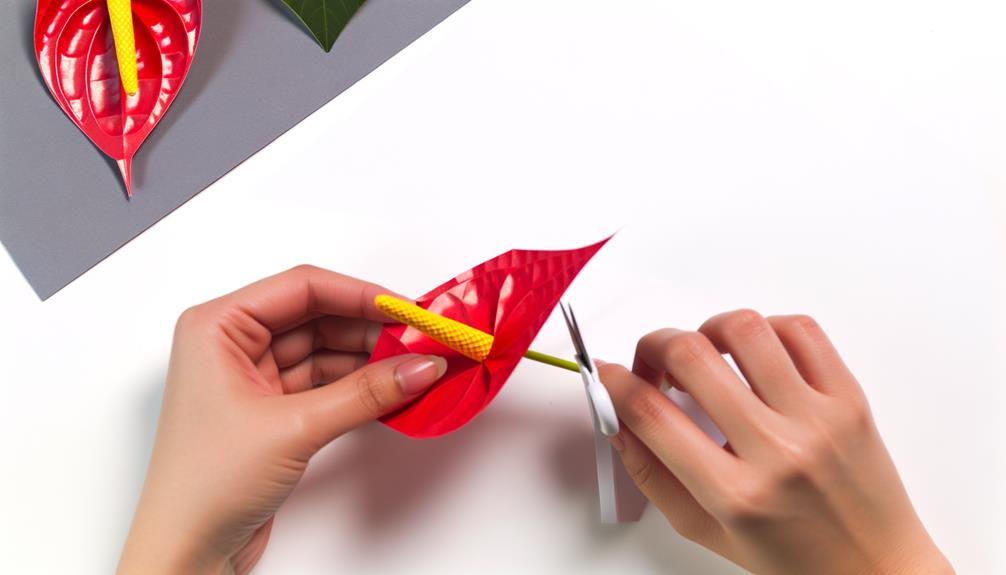
Creating a beautiful paper anthurium flower is simple and fun! First, gather red, green, and yellow colored paper, sharp scissors, glue stick, floral wire, ruler, and pencil. Cut red paper into petals, green for the stem, and a yellow rectangle to roll into the spadix.
Shape the petals by curling edges and adding a crease at the base. Draw veins for realism.
Assemble by attaching petals around the spadix, then secure with glue. Add the green stem and leaves.
Follow these easy steps and you'll craft a realistic paper anthurium flower. Keep going to learn more intricate details.
Key Takeaways
- Cut red paper into petal shapes and refine edges for smoothness.
- Create a green paper strip for the stem and a yellow rolled spadix.
- Curl petal edges and pinch the base for natural curves and creases.
- Draw veins on petals and blend colors for realistic details.
- Assemble the flower by attaching petals around the spadix and securing with glue.
Gather Your Materials
Before you start creating your paper anthurium flower, make certain you have all the necessary materials ready. You'll need red, green, and yellow colored paper, a pair of sharp scissors, a pencil, a ruler, glue stick, and floral wire.
Begin by laying out your colored paper. The red paper will make up the flower petals, the green for the leaves, and the yellow for the spadix. Use the ruler and pencil to measure and mark your paper, guaranteeing accuracy.
Having sharp scissors is essential for clean cuts. The glue stick will assist you in assembling the flower, while the floral wire provides structure and support. By gathering everything in advance, you'll ensure a smooth and enjoyable crafting experience.
Prepare the Paper
Start by cutting the red paper into petal shapes, ensuring each piece is symmetrical and smooth. Use a template or freehand the design, aiming for a heart-like shape. It's okay if it's not perfect; practice makes perfect!
Once you've cut the petal shapes, set them aside for now.
Next, take the green paper and cut out a long, thin strip to create the flower's stem. Make sure it's sturdy enough to hold your flower.
Now, grab the yellow paper and cut a small rectangle for the spadix, the flower's central spike. Roll it into a tight cylinder and secure it with glue.
Great job! Your paper is now prepped and ready for the next steps.
Cut Out Petals
Now, take the red petal shapes you set aside and use scissors to refine their edges, making them smooth and even. Carefully follow the outline you drew earlier, ensuring you don't leave any jagged edges. Hold the scissors steadily and make small, controlled cuts for precision. If you notice any uneven sections, trim them slightly until you achieve a clean line.
Once you've refined the edges, lay the petals flat on your workspace. Double-check each piece, ensuring they're all symmetrical and uniform. These refined edges will give your paper Anthurium a more realistic and polished appearance.
Don't rush this step; taking your time will make a noticeable difference in the final product. Great job so far—your flower is starting to take shape!
Shape the Petals
Gently curl the edges of each petal using a round tool like a pencil to give them a natural, lifelike curve. Hold the petal firmly at the base, then softly roll the pencil from the center of the petal outward. This will create gentle waves and add dimension. Repeat this process for each petal, ensuring uniformity.
Next, slightly pinch the base of each petal to form a subtle crease. This step enhances the 3D appearance and makes your flower look more realistic. Take your time and adjust the curves as needed. Don't worry if it's not perfect; natural petals have variations.
Continue shaping until you're satisfied with the overall look. Your meticulously shaped petals are now ready for the next step!
Create the Spadix
To create the spadix, start by choosing a bright yellow paper. Roll the paper tightly to form a slender tube, then gently shape it to resemble the spadix's natural form. Finally, attach the spadix securely to the center of your flower using glue.
Choose Yellow Paper
Select a sheet of bright yellow paper to craft the spadix, which will add a realistic touch to your paper anthurium flower.
Choose a sturdy, yet flexible, type of paper to guarantee it holds its shape well. Cut a small rectangle, about 2 inches by 1 inch, from the yellow sheet. This will form the basis of the spadix. Make sure your cuts are clean and precise for the best results.
You're doing great—precision is key here! Place the yellow rectangle on your work surface, ready for the next steps. Keep your tools handy and maintain a tidy workspace.
You've got this! With each step, you're closer to creating a stunning paper anthurium flower.
Roll and Shape Spadix
Begin by placing the yellow rectangle horizontally on your work surface, ensuring it's aligned for an even roll. This will become the spadix of your Anthurium flower.
Follow these steps:
- Start Rolling: Begin at one short edge and roll the paper tightly towards the other end. Keep the roll firm and even.
- Secure the Roll: Once rolled, apply a small amount of glue to the end of the paper to secure it. Hold it in place for a few seconds until the glue sets.
- Shape the Spadix: Gently press and shape the roll to make it slightly tapered at one end, mimicking the natural look.
You've now crafted the spadix, an essential part of your paper Anthurium flower!
Attach to Flower
Now that you have the spadix ready, carefully insert its base into the center of the flower, making sure it's aligned properly. Hold it steady with one hand.
With your other hand, use a dab of glue at the base where the spadix meets the flower. Press gently to secure it in place. Wait a few minutes for the glue to set. While waiting, check if the spadix stands upright and looks natural.
Once the glue is dry, gently adjust the petals around the spadix to enhance the flower's appearance. If needed, add a tiny bit more glue to any loose areas. Patience here guarantees a strong bond.
Your flower now has a beautiful, realistic center, bringing your paper Anthurium to life!
Assemble the Flower
Carefully align the petals and secure them together using a small dab of glue. Make sure they overlap slightly to create a natural look. Hold each petal in place for a few seconds until the glue sets.
Now, follow these steps to assemble your flower:
- Attach the Spadix: Place the spadix (the central part) in the middle of the petals. Use a small amount of glue to attach it securely.
- Shape the Petals: Gently curl the edges of each petal outward to give them a lifelike appearance. Use a pencil or your fingertips to shape them.
- Reinforce the Center: Add a bit more glue at the base of the petals where they meet the spadix for added stability.
You've got this!
Add the Stem
To attach the stem, insert the wire through the base of the flower and secure it with a small amount of glue.
First, take a sturdy floral wire and gently push it through the center of the flower's base. Confirm it's inserted straight to maintain the flower's balance.
Once the wire is in place, apply a dab of hot glue where the wire meets the flower's base. Hold it for a few seconds to let the glue set. This will keep the wire firmly attached.
If you want extra stability, wrap some floral tape around the base and the wire. This will reinforce the connection and give a more polished look.
You're doing great—your flower is almost ready!
Attach Leaves
With the stem securely attached, let's move on to adding the leaves to complete your paper anthurium flower. Follow these steps to attach the leaves effectively:
- Cut the Leaves: Cut out two or three leaf shapes from green paper. Make sure they're proportional to the flower and stem.
- Shape the Leaves: Curl the edges of the leaves slightly using a pencil or scissors to give them a natural look.
- Attach the Leaves: Use a small dab of glue at the base of each leaf. Press them against the stem, arranging them neatly around it.
Take your time to position the leaves in a way that mirrors how real anthurium leaves grow. You're doing great—keep going!
Final Touches
Now it's time to add those realistic details that make your flower stand out. Shape the petals with your fingers to create a natural, lifelike appearance.
Don't forget to add subtle color variations using markers or paint for an extra touch of realism.
Adding Realistic Details
Enhance the authenticity of your paper anthurium flower by adding subtle veins and natural color variations to the petals.
To achieve this, follow these steps:
- Draw Veins: Use a fine-tip marker or colored pencil to lightly draw veins on each petal. Start from the base and work towards the edges, mimicking the natural vein patterns of a real anthurium.
- Blend Colors: Lightly apply pastels or watercolor pencils to the petal edges, blending towards the center to create natural color gradients. Focus on reds, pinks, or greens for a realistic effect.
- Add Highlights: Use a white gel pen or a small brush with white paint to add tiny highlights and reflections on the petals, enhancing the three-dimensional appearance.
You'll be amazed at how these details bring your flower to life!
Perfecting Petal Shape
To perfect the shape of your paper anthurium petals, gently curve the edges using a bone folder or the back of a spoon for a natural, lifelike appearance. Hold the petal in one hand, and with the tool in your other hand, press and slide along the edges. This subtle curve adds realism, making the petals look more organic.
Next, slightly crease the center of each petal by folding it lengthwise and then unfolding it. This creates a central vein, enhancing the petal's depth. Don't worry if it's not perfect; nature isn't either.
Conclusion
You've now created a beautiful paper anthurium flower! While it may seem intricate, the satisfaction of seeing your handmade bloom is worth every step. Remember, each petal you shaped and every detail you added brings your flower to life.
It's the contrast between the simplicity of paper and the complexity of the flower that makes this craft so special. Keep practicing, stay patient, and soon your paper garden will flourish with stunning anthuriums.
Happy crafting!

